
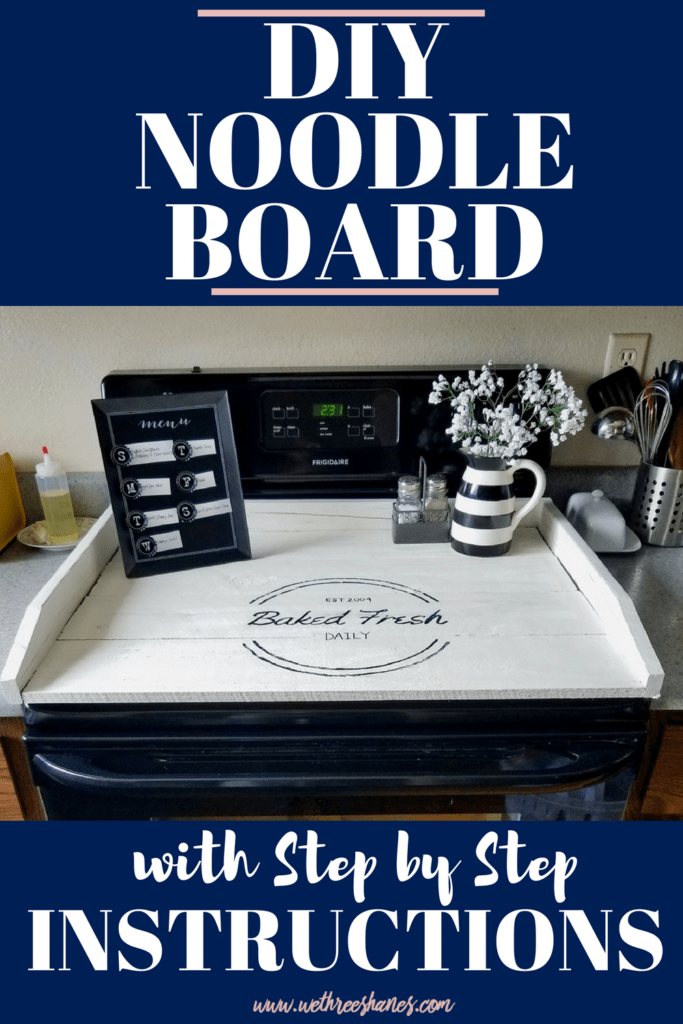
DIY Noodle Board Tutorial
Once used to dry homemade pasta, “Noodle Boards” are making a huge comeback! This DIY Stove Topper is the perfect way to add more useable space and character to your kitchen. Find out how to make your own in this easy to follow tutorial.
This post contains affiliate links. You won’t pay any extra for making a purchase through these links but we earn a commission for purchases made through links. This helps keep the blog running which we really appreciate! You can read more about it in our full disclosure.
DIY Noodle Board Tutorial
I’ve been seeing noodle boards, also called stove toppers, pop up all over Facebook and Pinterest lately but every time I click the link it takes me to a photo. Just a photo. No plans and no tutorials on how to make one. So I decided to make my own and share the tutorial with you so you can make your own cute DIY Noodle Board.
First you might be wondering, what the frick is a noodle board? It’s a board that was used to make noodles back in the day. The noodle board sat on top of the stove and once the pasta dough was made and cut to size, the noodles would be laid on the noodle board to dry out. Does anyone remember this?
I have no plans to actually make noodles with my board. Nowadays they’re used as a decorative touch and to add some extra surface space in a kitchen. It works great in my small kitchen and it helps me keep clutter off my stove top.
Lately, I’ve been washing my pans and setting them back on the burners to air dry, instead of drying by hand and putting them away. I’d much rather have a cute noodle board to go back on the stove top once the burners have cooled.
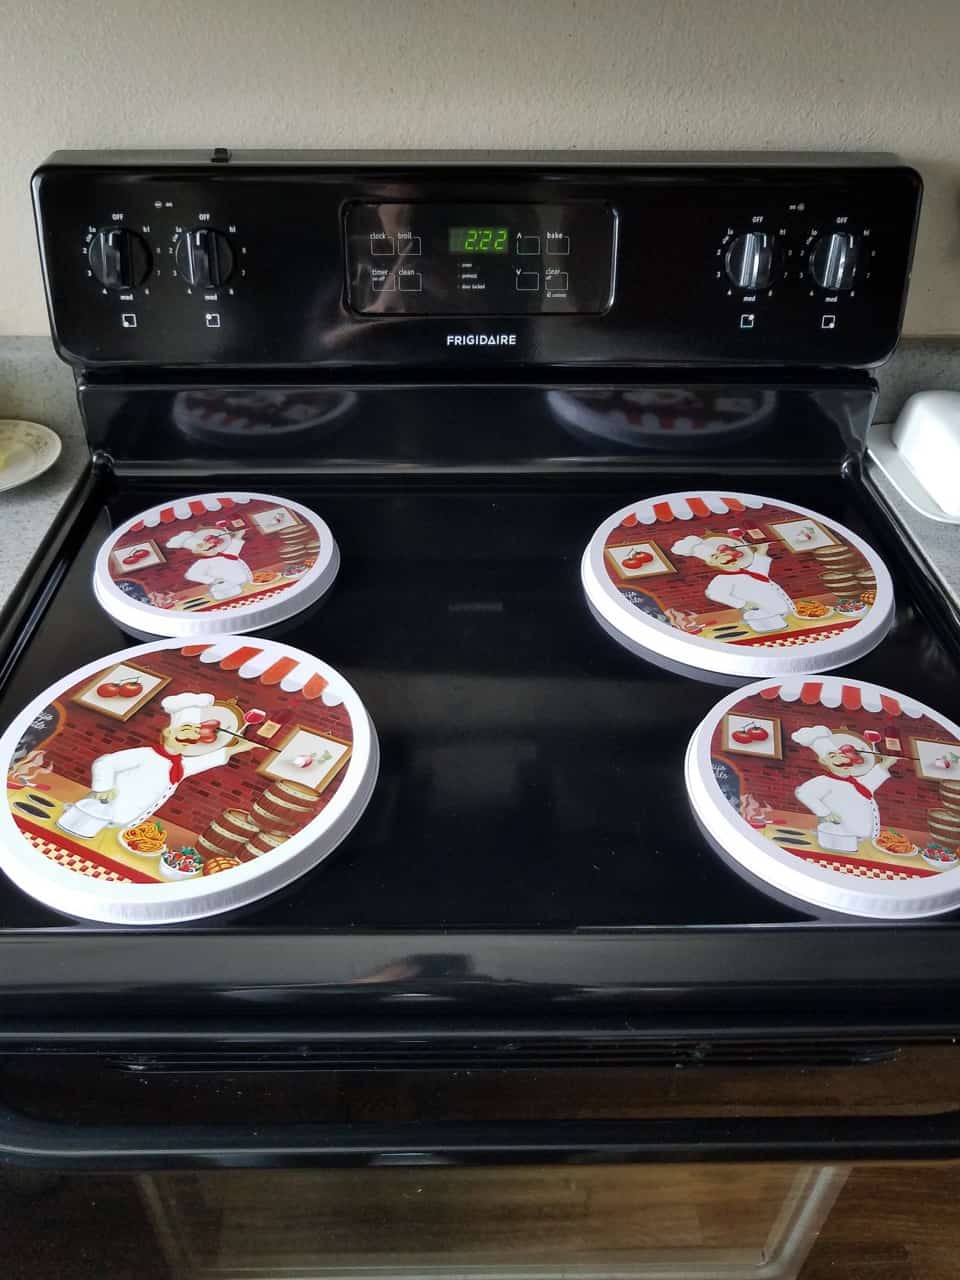
I did grab some cheap burner covers from the Dollar Store. I bought a 2-pack of two for $2 because…Dollar Store. I use them for some extra protection for the stove top. The noodle board sits on top of the protectors.
Choosing Wood for your DIY Noodle Board
When I do a DIY project, I like to keep costs as low as possible. I’m not buying the best wood for a project; I’m looking for cheap alternatives. If you can spend the money for high quality wood and would rather use that, go for it!
When looking for a higher quality wood that’s great for the kitchen, I’d go with a harder wood such as maple, bamboo, walnut, or cherry. Shopping at Home Depot or Lowe’s and choosing nicer wood gives you the option of having your pieces cut for you, which is pretty nice and makes this project even easier. I’m not sure if they will cut the pickets that I used but it never hurts to ask.
Since I’m going for cheap, I used 2 cedar fence pickets as the base of my board. These are just under $3 a picket (in Fort Collins). When I lived in Indiana they were cheaper. There are always great deals on them in the summer too.
If you are going this route make sure to pick boards that aren’t warped. Place the 2 boards you’re buying against each other to make sure they lay flat.
For the sides I used some salvaged wood so I’m not sure what kind it is. There are plenty of styles of wood to chose from at your local hardware shop. A furring strip is the perfect size and runs about 2 bucks. If you go the cheap route, which gives you a great farm house look, then you’re only spending around 8 bucks!
Materials Needed for your DIY Noodle Board
Now, materials will depend on the size of your stove top. You’re gonna have to do some math. SORRY! I’ll show you how I took, and then calculated, the measurements but you’ll have to do this yourself so that your board fits your stove. Once you have the measurements you’ll know how much wood you’ll need to buy.
For my homemade stove topper I used:
- 2 – 5/8 in. x 5-1/2 in. x 6 ft. Western Red Cedar Dog-Ear Fence Picket (used for the board base)
- 1 – 1 in. x 3 in. x 8 ft. Furring Strip Board (used for the back & sides)
- Wood Glue
- Protective Eye Gear
- a mask (so you don’t breath in all that saw dust)
- Hand sander and course sandpaper
- Miter Saw (I used a circular saw because we got rid of our miter saw when we moved. I wouldn’t recommend it though. It’s much harder to get a straight cut so my DIY noodle board has some very small gaps.)
- Brad Nailer
- your choice of either stain, paint, or both
- Furniture Wax
How to Build Your DIY Noodle Board
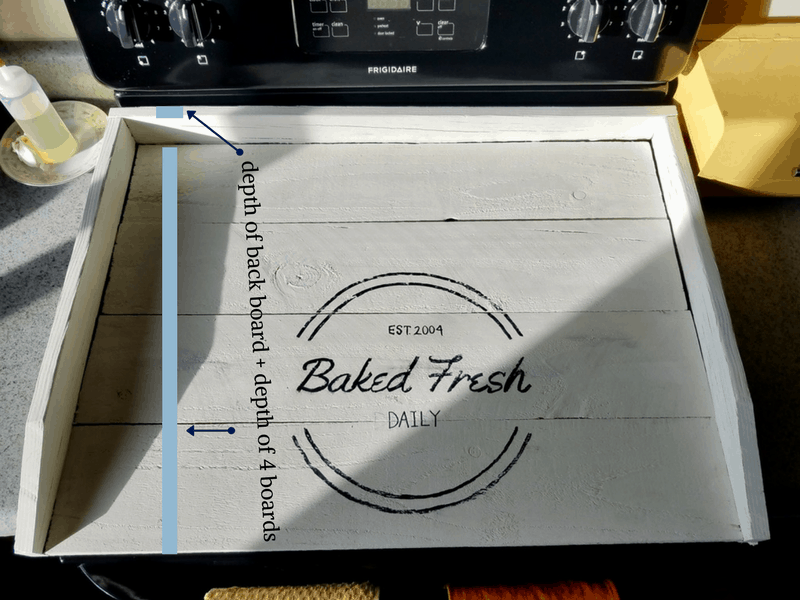
Start by measuring your stove top, across and from front to back. Next, measure your boards to see how many you need to cover your surface.
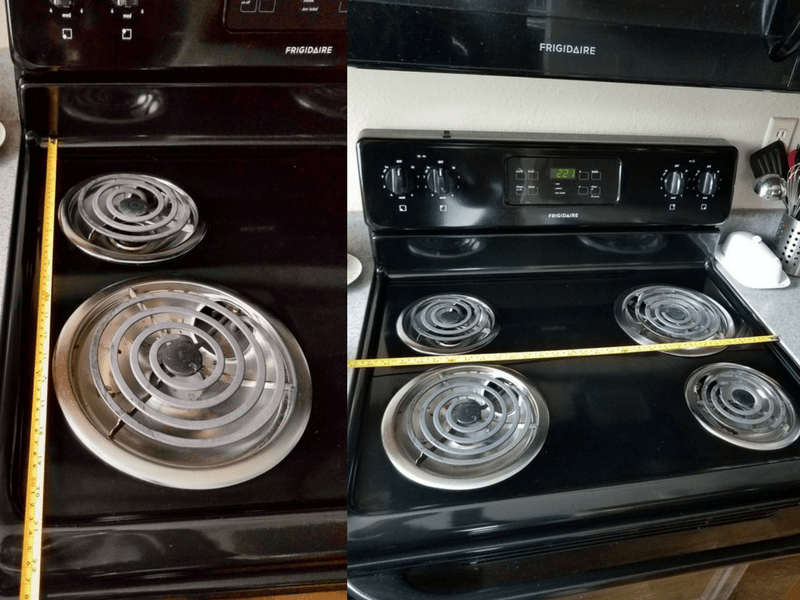
This is where those math skills come in. You need to take into account the back and side boards you’ll be adding.
- depth of 1 side board + depth of 1 side board + width of middle board = total width of stove top
- depth of back board + depth of 4 boards = total depth of stove top
Example Math
My measurements are 30 inches across and 22 inches deep. The fence pickets are just under 5.5 inches so I used 4 as my base. Now you have to measure the depth of your back piece. Mine is 2 cm.
Add the 2 cm to the (just under) 21.5 inches of the 4 pickets and it comes out to just over the 22 inches of my stove top depth. I didn’t want to deal with cutting a couple of cm off so that it fits perfectly on my stove, so my noodle board hangs over the stove top by a couple of centimeters. Not a big deal for me.
I wanted the width of the noodle board to cover the entire stove top which is 30 inches. The depth of the side boards I’m using are the same as the back board, 2 cm. There will be one on each side so that’s 4 cm.
- 30 inches = 76.2 cm.
- 76.2 cm – 4 cm = 72.2 cm
- 72.2 cm = 28.5 inches
I cut my picket boards to 28.5 inches so that once I added the sides that are 2 cm each I ended up with the full width of 30 inches.
The length you’ll cut your side boards will be the same measurement as the width of four picket boards together. In my case, just under 21.5. I cut a diagonal piece off the front of each side board to add a bit of detail. The back board will be the full width of your stove because it will go across the back of the whole board. My measurement is 30 inches.
Tips for Measuring & Cutting your Wood
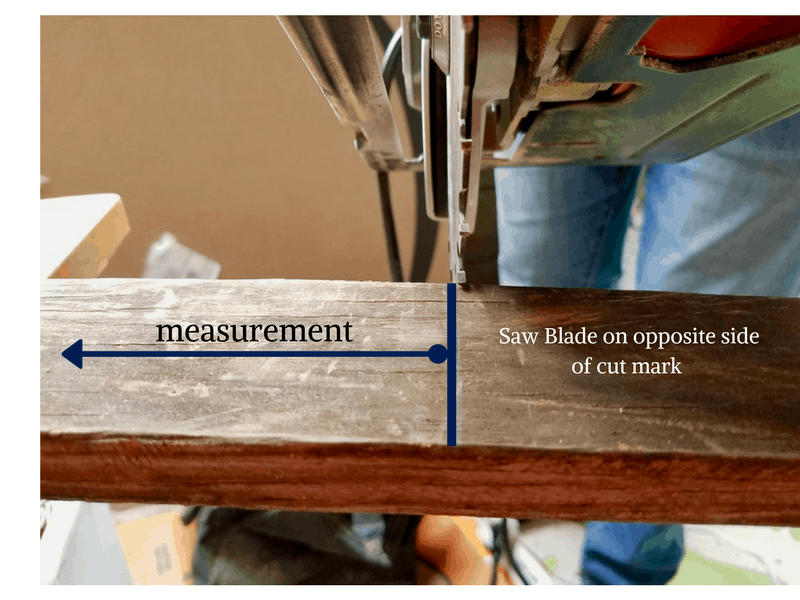
You can get two 28.5 inch boards from 1 fence picket and have about 12 inches of board left. Mark the first measurement on your board, measuring from the bottom of the board up, then cut. Make the next measurement and cut again. Don’t make both measurements and cuts at the same time.
When the saw cuts, it’s taking out a tiny bit off the board. That’s where all the sawdust comes from. If you make both measurements and cuts at the same time you will have a board that is slightly smaller than the other and we don’t want that.
Also before you make your cut make sure you are lining up the saw on the outer part of your cut line for the same reason. You don’t want the teeth of the saw to cut into your measurement or your board will end up slightly short.
Putting Your DIY Stove Topper Together
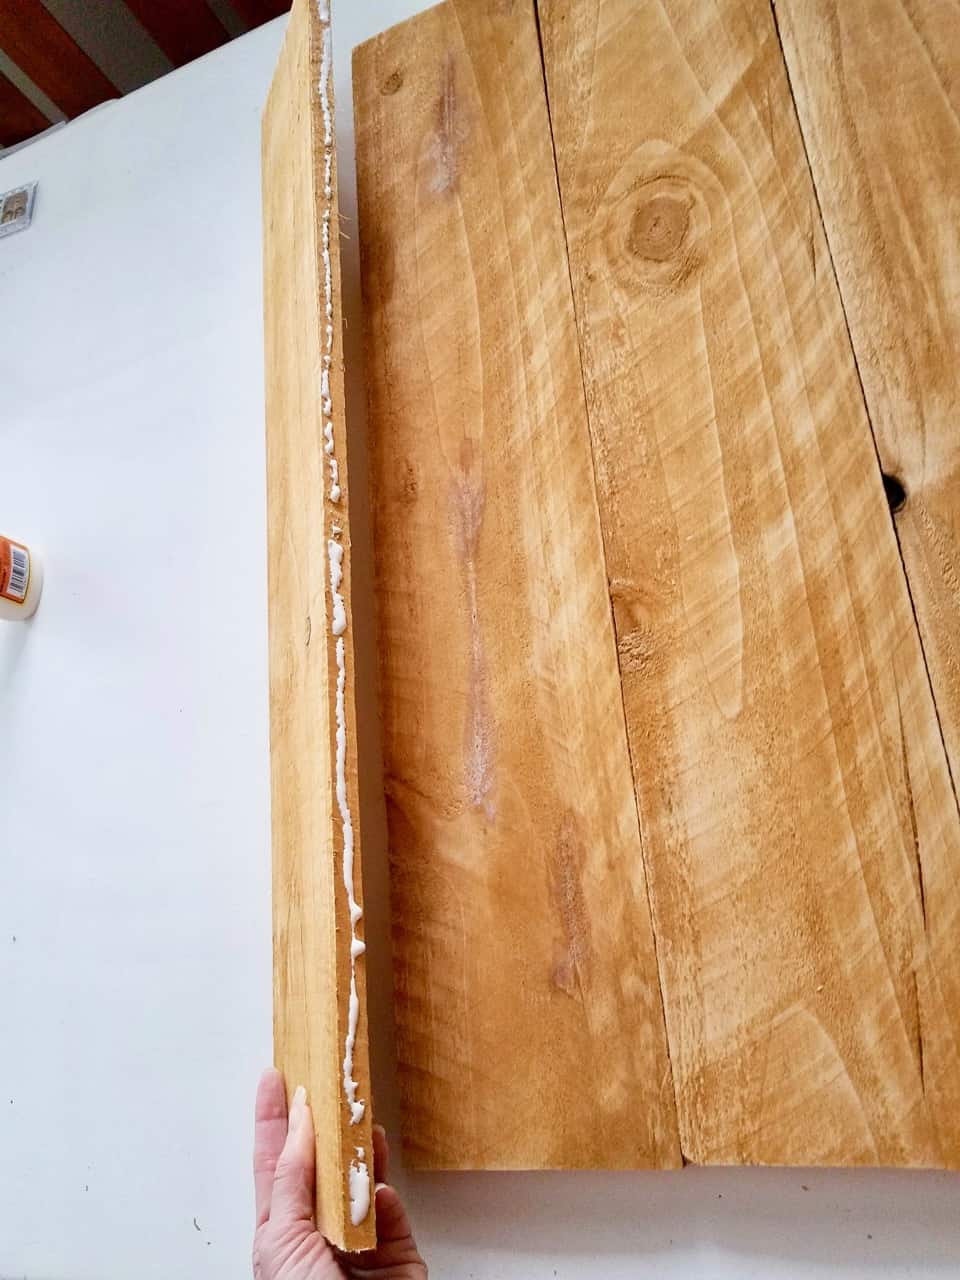
Once all your boards are cut you’ll sand them down. The picket boards are pretty rough so you won’t be sanding them smooth. This is actually one of the reasons I like to use the fence pickets; they add a weathered look to things.
Next, glue your picket boards together by adding glue to one side of each board and pushing them together. If you have a clamp you can use it across all boards until the glue dries. I don’t have one so I moved onto the next step which is nailing the sides on.
This is what will keep your boards together. The glue just helps make the whole thing sturdier. Using your brad nailer, nail your side boards on, putting 2 nails in each picket board. My husband helped hold the picket boards together while I nailed the side boards on but clamps will also work.

The last step is to nail the back piece on. Once the glue on your board has dried you can stain or paint it. If you want a more weathered look you can do both. I used Waverly Chalk Paint and Waverly Wax. I just painted mine because I wanted an all-white look to help brighten my dark kitchen.
If you would rather have a farm-house style you can check out THIS TUTORIAL from Sara over at Sincerely, Sara D., where she shows you how to use vaseline for a perfect distressed look. I’ve used her method many times.
Image Transfer to Your Noodle Board
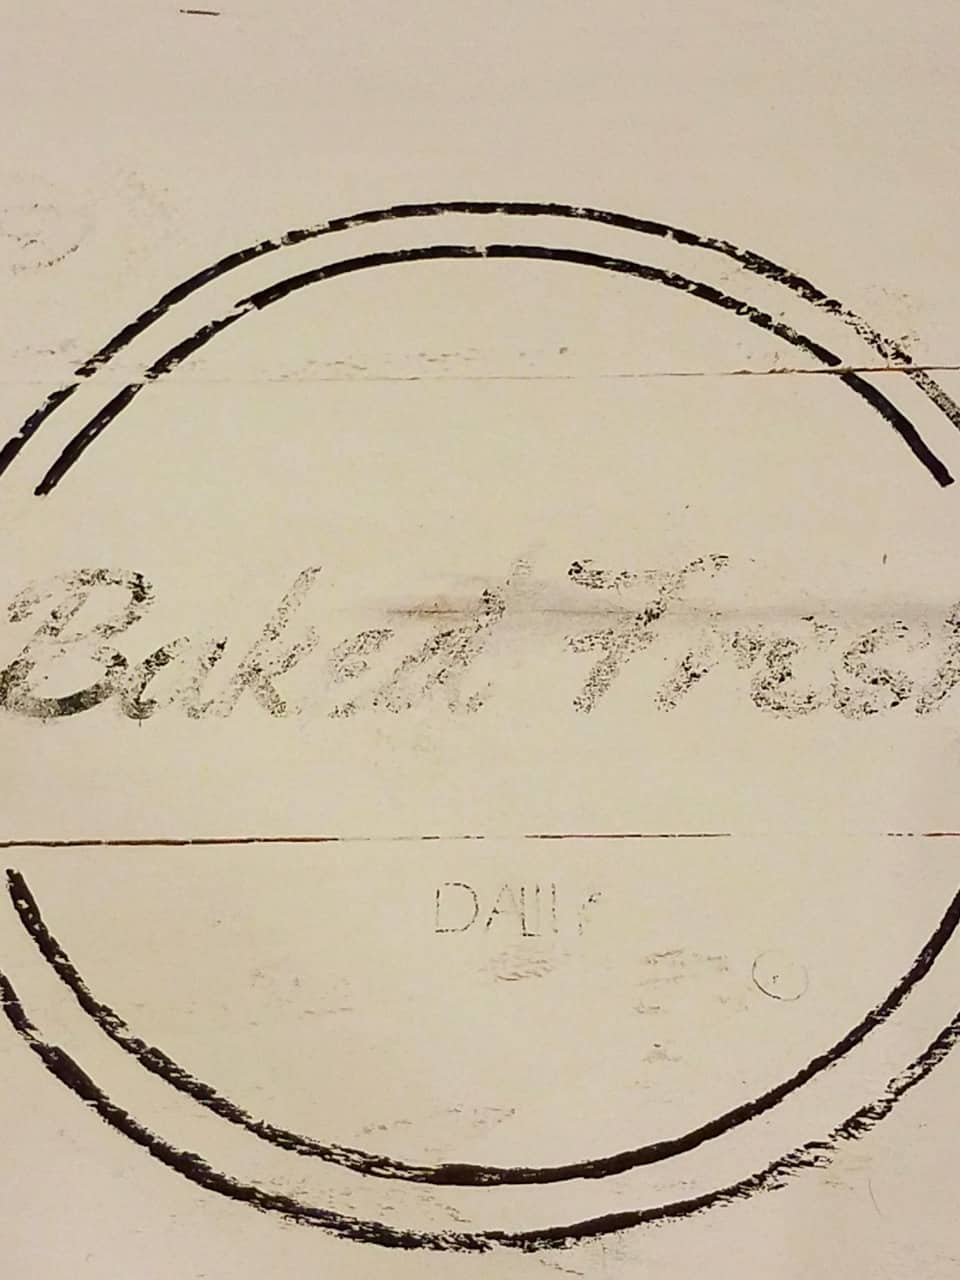
Once the stove topper was all painted I decided it looked a bit plain so I added an image. I used Canva to make the design and then I tried 4 different techniques for transferring the print to the board. 4 techniques were tried because the first 3 didn’t work. I almost gave up, but tried one more time because I knew the board would look better if I figured it out.
Before you print make sure your design is a mirror image of the one you want, otherwise you will end up with backwards words on your board. You need to use an ink jet printer, a laser printer won’t work.
- First I tried printing on the shiny side of freezer paper, but it didn’t work. I got the slightest transfer but most of the image wasn’t visible.
- Next, I tried wax paper and that didn’t work at all either.
- I found a tutorial on Youtube that printed on heavy plastic sheets but the plastic melted in my printer. Ya, I was not happy about that, and still get a little bit of melted plastic on paper I print out since. Hopefully it’s all cleaned out soon.
- The last thing I tried was to peel off mailing labels and use the leftover sheet that the labels came off of, making sure to print on the shiny side. This gave me my best transfer but it was still a bit light. I used a sharpie and a light hand to trace what was on the board, and darken it up. I think if I ever try to transfer an image to wood again I’ll try transfer gel and see if that’s any easier.
Lastly, I painted over the whole board with furniture wax to help seal the paint and design. It also ads a bit of shine which I like. Here’s the finished project.
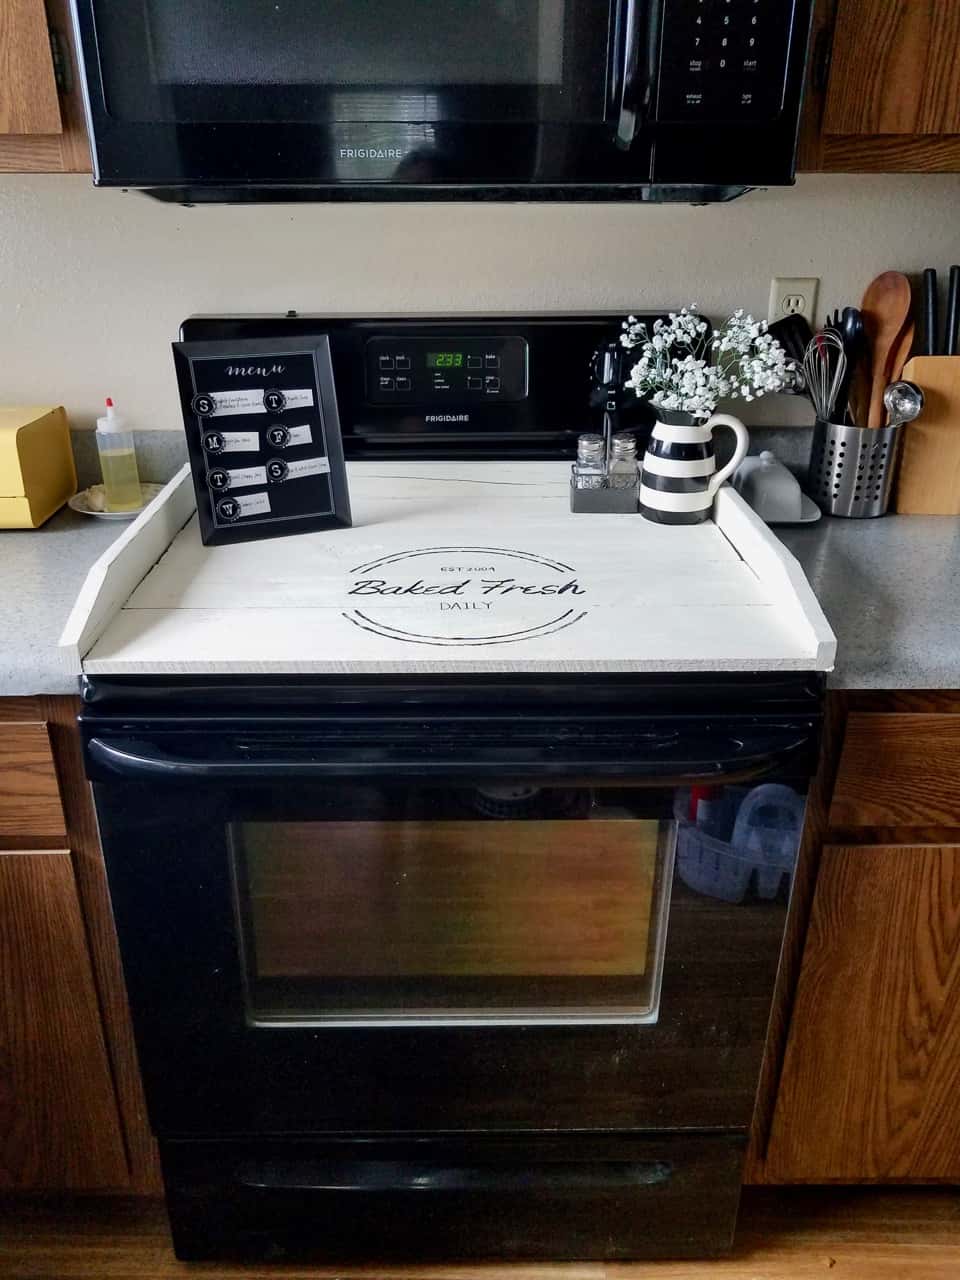
I LOVE the way my DIY Noodle Board turned out and I can’t stop looking at my cute kitchen! We currently rent and it’s a total ‘rental kitchen’ – dark boring cabinets, not much counter space and black appliances. The white noodle board adds some much-needed extra space in my cramped kitchen and it also lightens the place up.
When decorating my homemade stove topper, I used the Rule of 3 that Kristy wrote about in her last post. It’s such a helpful rule to know (you can check it out HERE if you haven’t read it yet).
Honestly I have benefited a lot from reading articles written in your own knowledge. Today I can make a DIY Noodle board by trying it myself.
.
Thanks for sharing
Thanks for adding our stovetop cover to your project list.
Thanks for adding our stovetop cover to your home projects list.
Hi! Do you have a template for the stencil? Thank you!
I’ve added the stencil to our Printable library. You’ll need to reverse the image before printing. Also, I wanted to print the stencil larger so I used the site Blockposters to enlarge and section the print to make it easier to print at home.
I LOVED this idea! Is very useful when you’re cooking if you need the extra space, especially for small apartments! Thanks for sharing the tutorial! I will be giving it a try 🙂
Jeanny from http://www.glitzbeautyblog.com
Thanks so much Jeanny!
Super cute Kim! I love how it turned out. I totally need one for my kitchen too.
Thanks Katie! I can’t believe what a big difference it makes in the look of my kitchen.