
Easy DIY Pumpkin Hoop Wreath Tutorial
Create your own cozy DIY Pumpkin Hoop Wreath with this easy to follow tutorial. The perfect Fall decor for your wall or door. It’s budget friendly and comes together in minutes.
(THIS POST PROBABLY CONTAINS AFFILIATE LINKS. OUR FULL DISCLOSURE POLICY IS LONG & BORING BUT, YOU CAN FIND IT HERE.)

Pumpkin Hoop Wreath Tutorial
Who’s ready for Fall? If you’re not quiet in the mood yet then this Pumpkin Hoop Wreath should nudge you in that direction. This is a really easy DIY project so beginner crafters will have no problem making it. It’s so simple you can get your mini crafters involved.
This is also a budget friendly craft that cost me less than 10 dollars to make. That’s a steal when compared to store bought wreaths. That’s why I love a good DIY project. You can put your own spin on it while saving money.
There are tons of ways to change up this Fall wreath to make it truly unique. I’ll show you how I made this exact wreath but I’ll also throw in some ideas to make it your own.
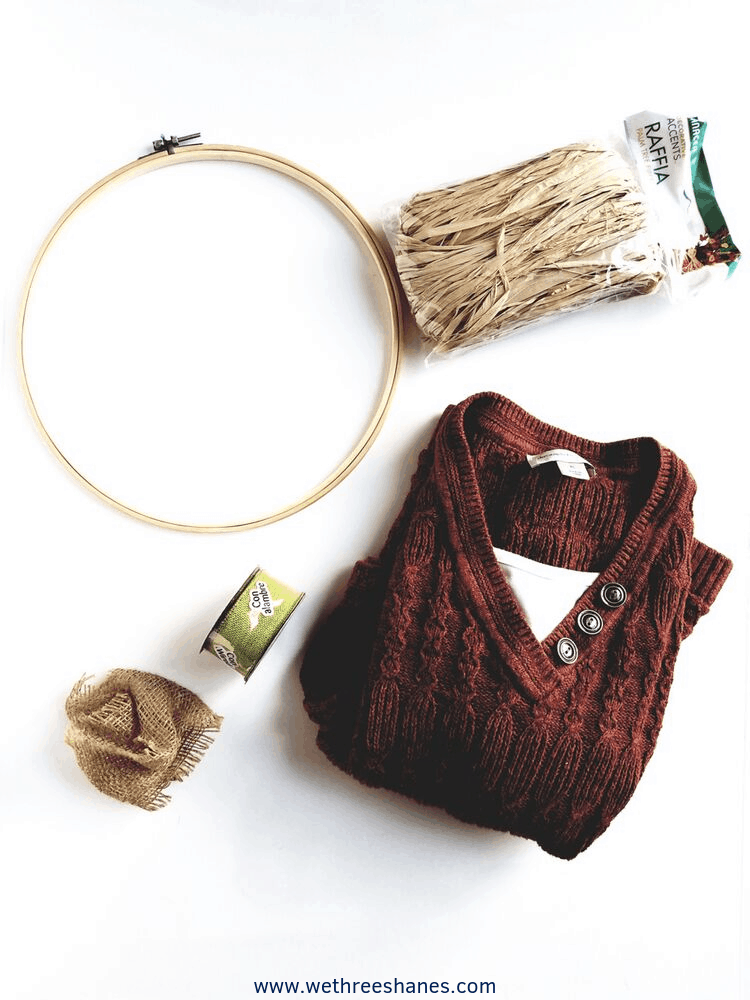
Supplies Needed to Make Your Pumpkin Hoop Wreath
- 12 inch Embroidery Hoop – I picked this up at Joanns and used a coupon which made it less than 3 bucks.
- Orange Fabric– at least 13 in x 13 in square
- Green Ribbon – roughly 4-5 feet. I used floral ribbon because it has wire in it which makes it easier to shape.
- Brown Ribbon or Burlap Strip – roughly 1 1/2 feet, less if using ribbon
- Raffia – just a couple strips
- Fall Saying – Metal, Wood, or Vinyl (optional)
- Special fabric scissors that no one’s allowed to touch but you 😉
- Glue gun or craft glue – maybe (I’ll explain more in a minute.)
That’s it. No wire needed to piece you’re pumpkin together because I wanted everything to be replaceable. That way when Winter comes around I can swap stuff out and reuse the hoop for a Christmas wreath.
Wreaths are a pain to store so I’d rather save the supplies in a small bag and swap stuff out based on the season. Feel free to glue stuff on if you want.
Changing the Look of your Pumpkin
Like I said before, there are many ways to change the look of your hoop wreath.
Material – When I first decided to make a pumpkin wreath, I pictured using an orange chevron, plaid, or buffalo check material. When I went looking for fabric, I didn’t find one that I loved.
There is a thrift store next to our Joanns, so I decide to see if I could find a flannel shirt that might work. I love to upcycle things and thought it could work well with this craft project. That’s when I found this orange/brown sweater. I loved the pattern and knew it would give my wreath a cozy Fall look.
Ribbon – The color and style of your ribbon can also change the look of your pumpkin hoop wreath. I wanted a fuller look on top of my pumpkin so I went with a loop form for my ribbon. Adjusting the size and shape of your bow can give your wreath a different look.
The brown ribbon or burlap is the “stem” of your pumpkin wreath. You can use anything you want for this. A stick or a pinecone would work just as well.
Add a Saying – Pick a cute Fall saying to add to your fabric. The type of fabric you choose will change the medium you use to create your words. Vinyl would not be a good choice for the upcycled sweater that I used. The sweater material is too textured for the vinyl phrase to stick smoothly.
I did find super cute metal words at the Dollar Store in the Fall decor section. You can use a bit of craft glue to tack one on.
If you use a smoother material then vinyl would be a great choice. Use a cricut/silhouette type machine to cut it out, find a friend who can do it for you, or order a vinyl saying from Etsy. One word won’t cost much.
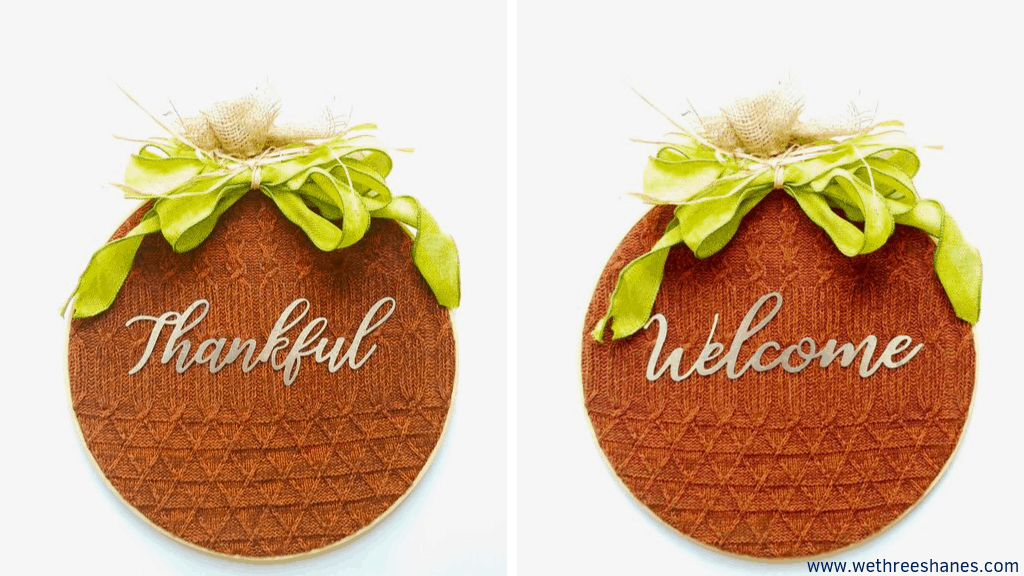
Need some Fall Phrase ideas?
Happy Fall Y’all
Hey There Pumpkin
Fall Leaves & Pumpkins Please
Pumpkin Kisses & Harvest Wishes
Oh My Gourd
Sweater Weather
Hello Fall
Pumpkin Spice Season
Pumpkin Spice Everything
Welcome to Our Patch
Pumpkin Spice & Everything Nice
I’m sure there are plenty more sayings out there but that’s enough to get you started.
How to Make A Pumpkin Hoop Wreath
Step 1 – Start by disconnecting the two pieces of embroidery hoop. Place the outer hoop on top of the material or sweater. Look at the pattern in your fabric and place the hoop accordingly. Next, place the smaller hoop inside your sweater or underneath your fabric.
Slide the hoops together, trapping your fabric in between and tighten the bigger hoop. Make sure the fabric is pulled taught before tightening it all the way otherwise you’ll have droopy fabric and it won’t hold a metal or wood saying.
If you are using a vinyl saying you should stick it to your fabric before you place the hoops.

Step 2 – Now, cut the fabric close to the embroidery hoop.

Step 3 – Decide what type of bow you want and then cut ribbon to size. Like I said before, I wanted a pouffier bow so I went with loops. I doubled the ribbon over itself until I got the size bow I wanted and then I cut the ribbon. Check out the picture below to see what I mean.

Step 4 – Gather the ribbon in the middle and tie with some raffia. Then slip that raffia through the metal piece on top of the embroidery hoop. Tie this off, making sure it’s secure. You can adjust your ribbon to form your bow either before or after you tie it on to the hoop.


Step 5 – Now, grab the brown ribbon or burlap strip. Thread it through the metal piece as well and tie it in a loop. If you are using something beside ribbon as your pumpkin stem then you can glue it on now.

Step 6 – Your pumpkin hoop wreath is done. If you plan on adding a metal or wood saying then you can glue it to your fabric now. Your cute new DIY wreath is ready to be hung on your front door or on the wall as Fall decor.

Another Quick Fall Upcycle Craft
If you used a sweater to make your wreath, like I did, then you have extra sweater leftover to use on other upcycle projects. One quick fall DIY craft you can make is some no-sew sweater pumpkins out of the sleeves of the sweater. I had some stuffing left from making my easy-sew fabric pumpkins last year, so I grabbed it and made two quick fabric pumpkins.
You simply cut off the sweater sleeves, tie off one end, then flip the fabric around, stuff the pumpkin, and tie it off again. There was plenty of raffia left so I used it to tie my pumpkins.
I made one pumpkin right side out and another one wrong side out to change up the pattern of the sweater fabric. I still have the front of my sweater left so I have one more Fall upcycle project idea to try. Stay tuned for that. I’ll make sure to link the post to this one when it’s up on the blog.


Don’t forget to pin this for later!

DIY Hoop Wreath
I loved how this Pumpkin Hoop Wreath turned out! I think it’s such a versatile Fall craft. It’s cheap and so easy to make. I’m already coming up with Christmas hoop wreath ideas that I can make by reusing the embroidery hoop.
If you make your own Pumpkin Hoop Wreath, we’d love to see it. You can Pin this to Pinterest and then add your photo there or send us a photo to [email protected] and we’ll show it off on our Facebook page.
Ow-some! activity KIM. I like these work and also doing this type of work whenever i’m free and have no work to do.