
Small Pantry Organization on a Budget
Small Pantry Organization is a great budget project! Check out these helpful space saving ideas that will turn you small pantry into a beautiful and functional space without spending a ton of money.
(THIS POST PROBABLY CONTAINS AFFILIATE LINKS. OUR FULL DISCLOSURE POLICY IS LONG & BORING BUT, YOU CAN FIND IT HERE.)
Pantry Organization on a Budget
It’s been just over a year since moving into my house. We jumped right into putting things away but now we want to make sure everything in our house is properly organized. Right now I’m focusing on kitchen organization.
The latest project has been organizing our small pantry. The pantry is the size of a small closet but our last place didn’t have one at all so it’s a win to me. I’ve been wanting to properly organize the pantry for a while now but it seemed like a big task that I just didn’t want to figure out.
Turns out it wasn’t as difficult as I thought. I learned some things on the way that really helped so I thought I’d share the tips with you. Follow my lead and you’ll have a hassle free, organized pantry without spending an arm and a leg.
I’m going to start with the small pantry organization tips and then I’ll break down the steps I used to actually organize my pantry. Everything I read about small pantry organization was really a list of things to buy so I wanted to make sure to go through the process too so you know exactly what you’re getting into.
Small Pantry Organization Tips
There is a lot that goes into organizing a pantry and if you jump right in with out thinking about the process first you can end up creating a bigger mess for more money. That’s definitely not what you want. While I will give you ideas on things to buy that really helped me get organized, these tips will cover more than just purchases.
1. Brighten things up!
Dark colors make space seem small and cramped. By lightening the pantry you’ll make it seem bigger and brighter. Painting everything white will illuminate the pantry and give you a nice clean looking backdrop for pantry items. Remove any dark shelf liners and instead paint everything in a glossy paint that is easy to wipe down.
You can see in the photos that my pantry had a checker board liner that added too much texture to the shelves. It clashed with items on the shelves and made things look more cluttered. Removing the liner made things look instantly cleaner.

2. Don’t over crowd your pantry.
When you have a small pantry it never feels like you have enough space for everything. In reality you do. If you want an organized pantry, you can’t stuff it to the max.
You’ll always need space for bulky things like flour and sugar, things you buy that will last months. However, when it comes to smaller, one use items you shouldn’t stock up. Buy what you need for a week or two and that’s it. You don’t have room for 30 cans of soup so don’t buy that many. No hoarding allowed!
If you are someone who can’t pass up a good deal or does food storage, then you’ll need to find space elsewhere. I have a small spot on a shelf in the garage for such items. If you don’t have room in the garage then you have too much stuff in your garage. Decluttering a couple of things will give you the space you need for extra food storage.
Containers are a must!
Take things out of boxes and packaging when possible. You are going to need lots of containers and baskets in different shapes and sizes. However, don’t run right out and buy them before you know what you actually need.
1. Look through your pantry to see what food needs to go into it’s own container versus what can go in a basket with other things. If something comes in it’s own box then consider getting a container for it. Think pasta, rice, flour, sugar, snacks etc. If items are smaller or individually wrapped then consider putting them in a basket. Think sauce packets, sprinkles, granola bars, ramen, etc.
2. Check the ounces of a full bag or box and then buy a container that’s slightly bigger. You don’t want to buy a container for something based of the amount you have right now only to run out and find that a new, whole bag doesn’t fit in the container you bought for it.
Make a list of the item and container size needed. You’ll end up with a long list but it will make it easier to know exactly what containers you’ll need. Keep the list because you’ll need it when it comes time to do the actual organizing.
3. Once you know what you, need shop your house first. This will help keep this a budget friendly project. Search your rooms, garage, and closets for baskets and containers that you might be able to use for this project that aren’t being used at the moment.
4. Next, search your local thrift stores and yard sales for containers and baskets in the sizes that you need.
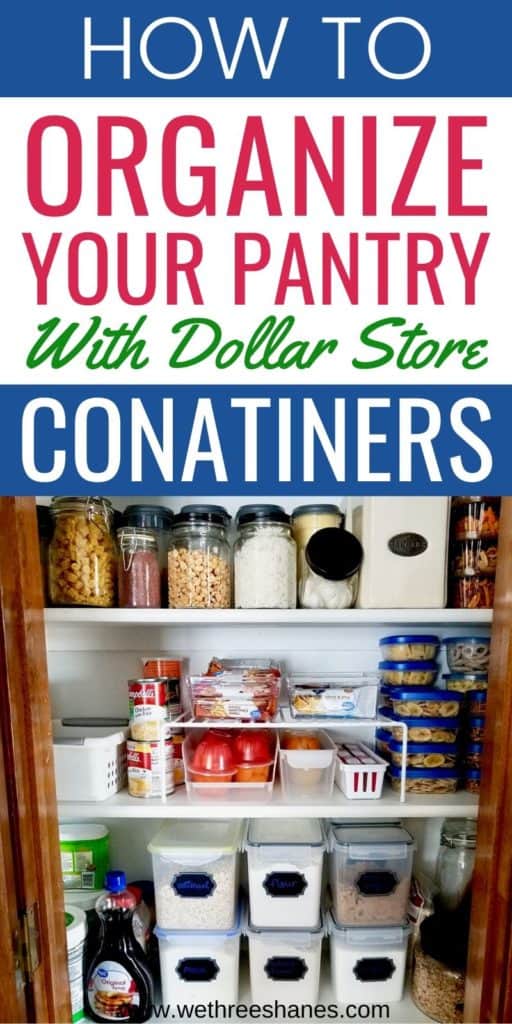
5. After thrift stores come the Dollar Store! You can buy so many cute baskets and boxes there. I bought many of my pantry organizers there. They are starting to get smart about the colors they have too but you can always buy things in any color and then spray paint them. I painted a couple of jar lids black because I liked the look better.
The cute colors seem to go first so check back often if you don’t find the colors you want at the Dollar Store. I bought my blue basket on a Fri and then decided I wanted one more. I went on Mon and the blue were gone. I plan to go back soon to see if they restocked yet.
Look in every section at the Dollar Store for containers. There are containers in there own section plus in the automotive/tools, cosmetics, Tupperware, and kitchen sections. Also, look at more than one store. I have two Dollar Trees in my area and both have a different selection.
6. Try other discount stores like TJ Maxx or Big Lots before turning to more expensive stores. After shopping my house, thrift stores, and the Dollar Store I did end up buying one set of air tight food storage containers for baking staples. That was the biggest cost and it was still only $32 for 6 containers.
Clear vs solid containers and boxes
You are going to want both clear and solid color containers in your pantry. Anything you want to see goes into a clear container. Items I have in clear canisters are things like rice, beans, dried peppers, pasta, baking staples, cereal bars and more.
You’ll want solid baskets or boxes for smaller things that tend to look cluttered like sauce packets, baking decorations, bags of things like croutons or chips. These are things you don’t want to have to push aside to get to items in the back either. You can take the whole basket out, grab what you need and then put the basket right back in it’s place.
Shapes of Containers matter.
Really consider the shape of containers and baskets before you use them. In my opinion, square/rectangle containers work best in a small pantry because they use up the most space. Round baskets leave more free space around them. It may only seem like a little but we want to use ever usable space.
Round baskets also don’t hold as many items. Many grocery items come in a square-ish shape and putting those things in a round basket will take up more space because of the awkward fit.
Jars are the exception. I love to use mason jars to hold smaller items like pasta, beans, and rice. They hold small these types of small items perfectly. They look great and the jars sit very close together so they don’t waste space.
Jars can be really inexpensive too. You can grab a 12 pack for $15 on Amazon but a bit less in stores. You can also reach out to people to see if they have any they aren’t using. I’m constantly seeing people giving away jars in Facebook groups. The Dollar Store also has jars so if you don’t need 12 of them you can check there.
3. Labels make a huge difference.
I can’t tell you what a difference labels make. I don’t know why but they just look cute. Plus they help your family find things in the pantry easier. Before the pantry was organized, I was constantly being asked to find things for my husband and kiddo. Now they can find everything on their own.
However, Don’t put labels on your containers until you know how they’ll fit in your pantry. I had to try a couple of stacking combinations before I figured out the layout that saved the most space.
When I first put the containers in that pantry I tried them one way and realized I could save more room if I turned everything. If I had put the labels on before trying things out then I wouldn’t have been able to see the labels once I turned them.
4. Susan is your friend.
Use a Lazy Susan for jars like oils, vinegars, and sauces. To keep things on budget I used two round cake pans that were taking up space in my cupboards. Just put some marbles in between the two pans and you got yourself a Lazy Susan. You can pick up pie pans and marbles at the dollar store too.

5. Use every space!
Small pantries run low on space so you have to use every bit of it you can. Use extra shelves between shelves that are too tall so you can stack more things. Use under storage shelves and drawers as well.
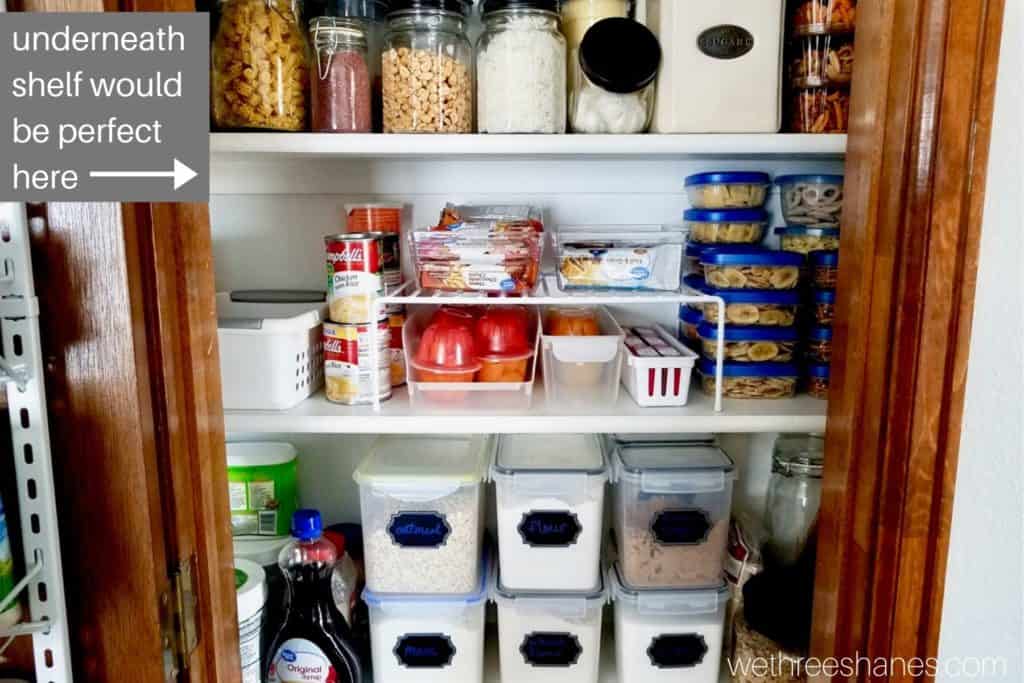
This would be a great place for some under shelf storage but for now I found the tip from above about not buying too much means I don’t need it. If things get too crowded in the future it’s a space I can considering using.
Get a door rack! I can’t believe how many items these things can hold. Place baskets on the floor as well. That’s usable real estate. I have two big baskets on the floor. One holds big bags of things like chips and pretzels and the other holds onions and potatoes.
6. Middle shelves for most used items.
Place most used items and heavier items in the middle of the shelves. This makes every day items easy to grab. Place less used things to the sides and higher up.
They will be slightly harder to get to but since you don’t use these items on the regular it won’t bother you as often. This is also where the Lazy Susan goes so you only need to turn it to reach the item you want.
7. Leave cute items on display.
Consider keeping cuter items out on your counters instead of in your pantry. Find a nice spice rack that will look nice sitting out. Or maybe some charming flour and sugar jars that will look great on display. Even oils can be kept in cute jars next to the stove where you’ll use them more often.
8. Do what works for you.
I know I just gave you a bunch of tips but they might not all work for you. It’s ok to ignore some of them if you just aren’t feeling it. Don’t look at other small pantries and think you have to copy them completely. Your cooking style and family size is going to be different so figure out what you need.
Look at what’s working for you now and keep it. Only change the things that aren’t working. For instance, I have a kid who needs a snack and lunch for school every day. I have an entire shelve dedicated for his school stuff. You might be out of that phase of life so you just don’t need it. You’ll be able to fill that space with something that fits for your family.
I’ve also seen people suggest only using one type of item such as hot sauce but that doesn’t work for me so I ignore that advice. I have at least 5 kinds of hot sauce for different types of food. Would it save me pantry space if I only had one? Sure but what kind of life would that be. My point is, do what works for you and ignore the rest.


How to Organize Your Pantry
Now that you have all the containers you need, let’s actually start organizing your pantry. You are going to make a mess so start with a clean space. I know this might sound counter productive but a clean space will give you the room you need to make a mess.
Find a good podcast or playlist to listen to while you’re organizing. Trying to watch something is too distracting. You’ll find yourself missing what’s being said or trying to see the TV and the organizing will take longer.
This project will take hours and you’ll need to do it all at once otherwise you’ll be living in a mess. I worked on my pantry will my kid was at school and husband was at work. If you don’t have that luxury then swap babysitting with a friend or have your partner take the kids out for a day over the weekend.
1. Start by getting everything out of the pantry.
Immediately get rid of things you don’t use or are expired. Remove any shelf liners you don’t want and then clean your shelves.
2. If you need to paint then your timeline will change a bit.
It won’t actually take you very long to paint but you also need to consider drying time before putting things back. Consider cleaning out your pantry one afternoon so you can paint that evening. Then things can dry over night and you can put items back into the pantry the next day.
You can also paint in the morning and do your decluttering and putting things in their new containers while you wait for paint to dry.
3. Empty Items into Canisters
Grab your list of items and container sizes and start carefully dumping the items into the correct size container. This can get a bit messy so transfer food in an easy to clean up space. Throw away and recycle empty bags and boxes.
4. Start a Box for food That’s almost gone
Things that are almost gone don’t need a space in the pantry unless you plan to rebuy them. For example – I had a bag of white rice that had about one cup left. I only plan on buying brown rice from now on so I don’t need a space for the white rice. Instead, I put the rice in a box that I left on the bench in my kitchen.
All items that need to be used up but you don’t plan on buying again go into the box. You’ll use these items up first until the all the items are gone.
5. Sort by Category
When putting items back into the pantry, sort things by category – school snacks and supplies, baking, pastas, etc. Remember to put most used items in the middle section and less used stuff on the side and up higher. Putting kids stuff at their level can be helpful.
It’s a bit like playing Tetris. You’ll put less important stuff in first and then fill in the middle sections with most used items. You will have to swap things around until you find the best fit for everything. It can be a bit of work but when it’s all done it’s very rewarding.
Small Pantry Organization Makeover
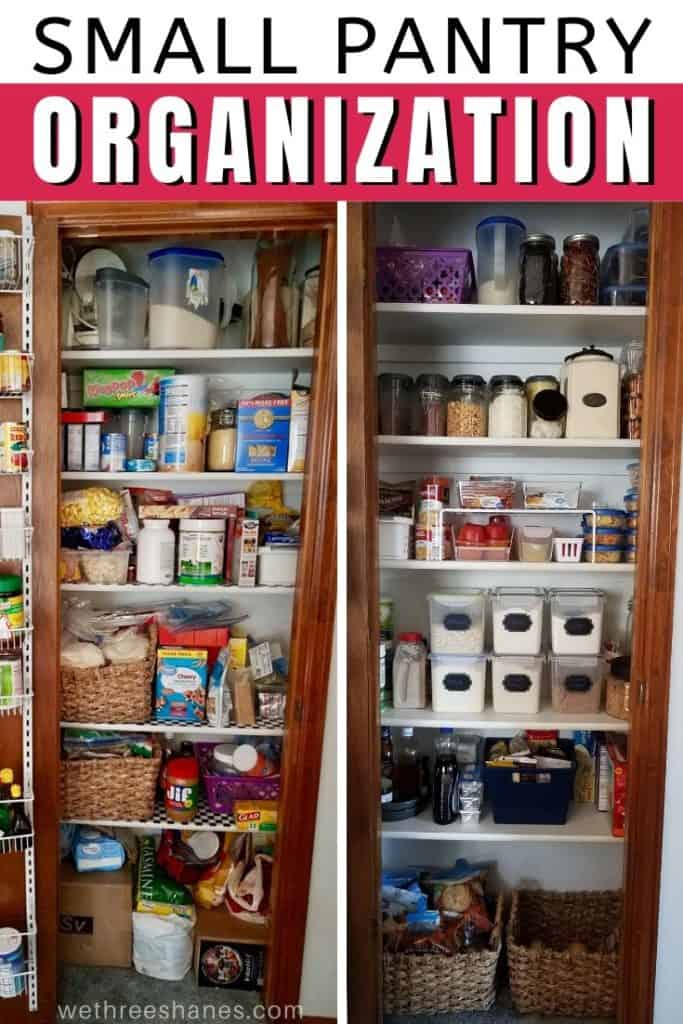
Lets see a quick reminder of what my small pantry looked like before I started my organization project:

You can see that everything was pretty much just shoved into the space without much organization. I had baskets and containers but they weren’t being used to their full potential. The pantry was definitely overstuffed and not very functional.
Now my small pantry is completely organized. I can see all of the items I have, they’re easy to get to, and the rest of my family can find items without my help. I love the clean, bright look and every time I open my pantry I smile. I’m not sure how long that will last but I’m hoping it lasts. My pantry no longer feels small even though it is.

The Total Budget
When I started this organization project I already had some dollar store containers, mason jars, and the door rack. They weren’t being used to their full potential. The total I spent on the project was just under $50. Like I said before, I bought some air tight containers for $25 and the rest I spent at the dollar store.
However, if you are starting this project from scratch you’ll be spending much more. Let’s break things down just a bit (remember prices can change):
- The over the door rack was $38.
- Those large baskets were bought at Micheal’s during a sale for $10 each.
- Mason jars are $16 for a 12 pack.
- Again, the air tight containers were $25 when I bought them.
- Then about $25 was spent on jars, tupperware, baskets, and containers from the Dollar Store. You’re cost would most likely be less because I bought a lot of small tupperware items for school snacks.
That makes the total for this small pantry organization project come in just over $125 when tax is applied. I still think that’s a pretty good budget for something like this. If you shopped exclusively at the Dollar Store and thrift stores for the baskets and containers then money could definitely be saved.
One Comment