
How to Sew a Scrunchie Like a Pro!
Learn how to sew a scrunchie like a pro with this easy to follow tutorial with pictures. A fun beginner sewing project that is great for kids and teens learning to sew!
(THIS POST PROBABLY CONTAINS AFFILIATE LINKS. OUR FULL DISCLOSURE POLICY IS LONG & BORING BUT, YOU CAN FIND IT HERE.)

How to Make the Perfect Scrunchie!
If you’ve ever wanted to sew your own scrunchies then you’ve come to the right place! And if you’ve never wanted to make any, well, maybe you’ll want to try after you see how easy they are to make.
If you haven’t noticed, scrunchies have made a big comeback! Girls are wearing them in their hair again and also on their wrists. This scrunchie tutorial will not only show you how to make the perfect scrunchie for your hair but will also make sure it fits comfortably on the wrist as well.
This is an easy sew project so it’s great for beginners. Making these scrunchies with my daughter was a fun project to keep us busy while schools out.
What Makes a Good Scrunchie?
Let’s talk about what makes a good scrunchie for a minute. Obviously, you might have your own opinion on this but here’s what I look for:
- A scrunchie needs to stay in your hair and really hold it in place.
- Like I said above, scrunchies need to feel comfortable on your wrist or it’s almost no good these days.
- The perfect scrunchie needs to be easy to make.
- It needs to look cute!
DIY scrunchies cover all of the above requirements because you are in charge of how your scrunchie turns out. Plus, you can easily adjust things if something doesn’t come out as planned. While it is easy to buy your scrunchies at a store, it’s fun to design your own scrunchie by picking out the fabric yourself.

Supplies You Need To Make Your Scrunchie
When it comes to making scrunchies at home it doesn’t take too many supplies. You might even have everything already, making this a super cheap sewing project.
- Fabric
- Elastic
- Thread
- Scissors
- Something to measure with
- Sewing Machine
- 2 Safety Pins – optional but helpful
What’s the best fabric for scrunchie making?
While it would be nice to use any fabric you want to make your scrunchie, some fabrics are harder to sew. If you’re a beginner sewer then I’d stick to a light weight, non-stretchy fabric like cotton or lycra because it will be easy to sew.
Velvet or satin might make a cute scrunchie but they are harder to sew. It doesn’t mean it’s impossible but maybe make those scrunchies after you’ve had some practice.
These homemade scrunchies don’t take too much fabric so they are great for using up fabrics scraps. If you’ve got some laying around then check them out first before running to the store to buy more fabric.
How about elastic?
Personally, I use what’s on hand. I sew a lot, so I used elastic I already had at home. It’s best because I’m not spending any extra money and I don’t need to go to the store. This beats other requirements for me.
If you don’t already have elastic at home, then I would buy 1/4 in (6mm) wide elastic. You want something that resembles an elastic tie, not too thin or two thick. 1/2 inch wide elastic might be easier to work with so if you are making scrunchies with someone who’s younger you can use it and it won’t make a huge difference in hair holding ability.
How to Make a Scrunchie
Enough with all the talking. Let’s get to work! I would read all the steps first and then start sewing. That way you don’t get anything mixed up.
- Start by cutting a strip of fabric 26 inches by 4 inches. These measurements will give your scrunchie some good ruffle with out being too much. You can cut your piece longer and/or fatter. A longer piece will give you more scrunch while a wider piece will make your scrunchie fatter.
Make sure to iron your fabric to get it nice and flat. (Mine had been in storage and was super crumpled.)

2. Next, you want to fold the fabric length wise with the right sides of the fabric facing each other and pin the open side all the way down the length of your fabric. You want to leave at least 2 inches on each side open. You’ll see why later.

3. You should now have a long tube. Turn the tube of material right side out.

4. Take the two ends and line them up with right sides together again. We need to sew the two sides together. See picture if this sounds confusing. Basically we are sewing the ends together so we can thread the elastic. Once this is done you can see the end is near.

5. You need about 7 inches of elastic. We made some before that were smaller but my daughter didn’t like how tight they were on her wrist. If you have a tiny girl, I would just wrap the elastic around her wrist and add an inch. This should be perfect.
Same goes for if you are making a scrunchie for yourself. I’m on the heavier side and 7 inches wasn’t quite big enough to fit comfortably around my wrist. But chances are I won’t be wearing it on my wrist around the house like a bracelet the way my daughter does so it just depends on your own personal preference.
Likewise, if you have very thick hair you might want a bit more elastic so you can twist the DIY scrunchie around your ponytail a couple of times.

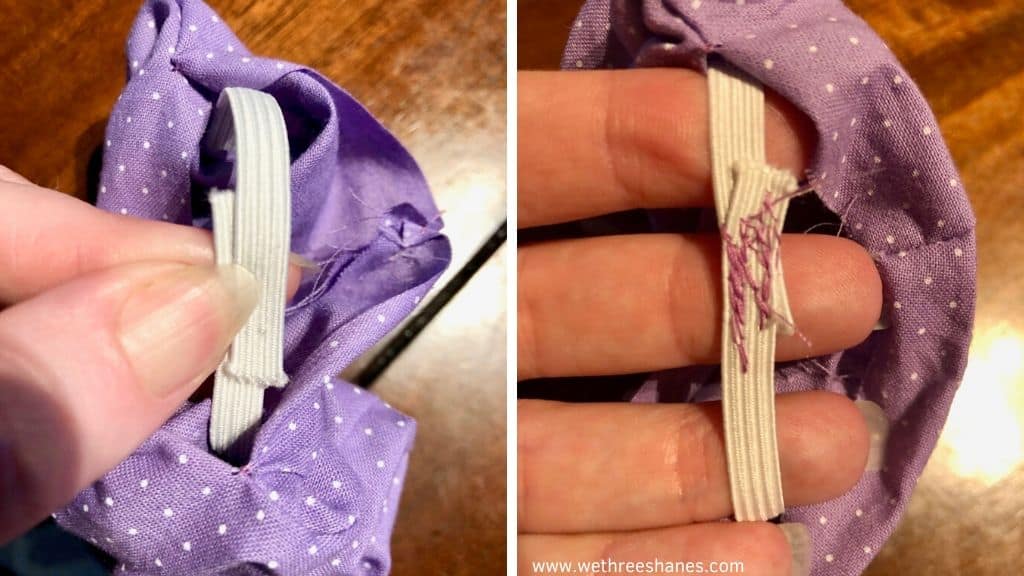
6. Now, we need to feed the elastic through the tube. I like to safety pin one side to one end. And feed the other end of the elastic through with a safety pin on it as well to help make its way through.
7. Now over lap the elastic and sew the elastic together. I go back and forth over and over again to insure that the elastic is sewn together really well and won’t come apart later. It doesn’t look pretty but no one will see so shhhhhh!
8. It’s time to sew the hole shut. You have three options to sew the scrunchie closed. You can simply use glue and glue it shut or you can sew it with the sewing machine. You need to fold the ends over and then either glue the folded ends together or sew it shut with the machine which is what I do.
However, my daughter is a perfectionist so we usually turn to option 3 which is to hand sew the hole closed so there is no visible stitching. This is called a ladder stitch.
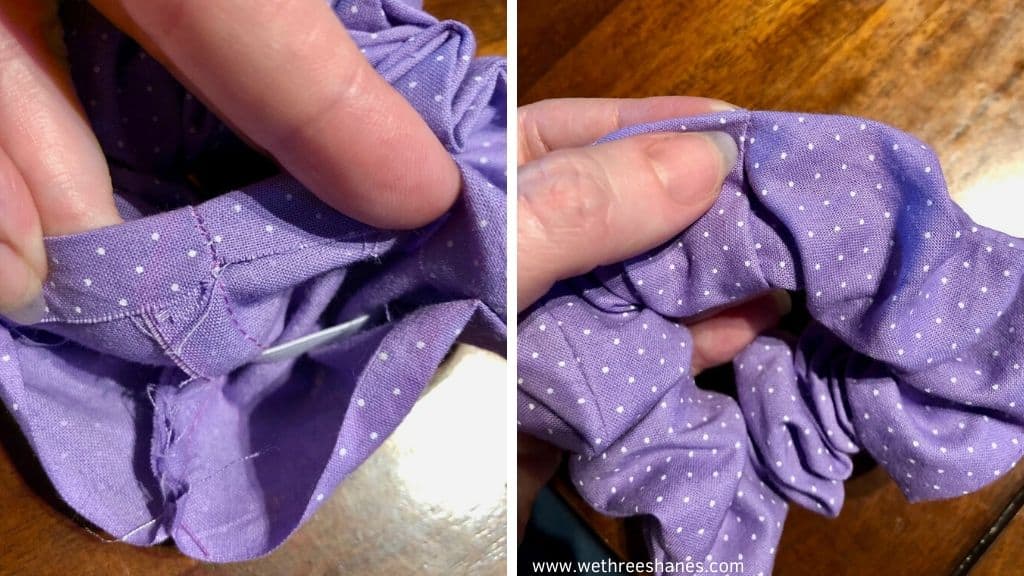
To hand sew the scrunchie hole closed, you want to get a needle and thread and tie a knot to close the thread. Next, you want to start from the INSIDE of your scrunchie hole. That way the knot will be on the inside of the scrunchie and not show. Then pinch the hole closed and pull the needle through to the other side.
Instead of pulling the needle all of the way through, you want to poke it into the fabric and gently glide the needle on the inside of the fabric fold about a 1/4 of an inch and then poke the needle out continuing to pull the thread all of the way out.
Now, cross over to the other side of the fabric and do the same thing. Keep switching back and forth until you make it all the way down and the scrunchie is closed. Then, I like to tie a knot and Ta-Da! You have yourself a scrunchie.
If that plus the photos below aren’t quite enough to figure out the ladder stitch you can check out this quick video.

These scrunchies really are easy to make and can be done very quickly. It’s fun to make a couple at once while you’re all set up. Find some complimentary fabric and make a bunch. They will look so cute stacked on your daughter’s wrist and in her hair!
These would make a great DIY gift that girls can make for their friends or even turn it into a little side business to make a little extra money.
Let us know if you make your own scrunchies and if you have any questions feel free to ask them in the comments section. We’re always respond! Don’t forget to pin for later!

Hi. Is there a suggested thread for use with scrunchies? Does using polyester or cotton thread matter?
The thread really doesn’t make a difference so use what you have.